
Testcontainers를 이용한 한글 형태소 검색 테스트 환경 구축하기
Intro
회사에서 Elasticsearch를 이용해 만들어진 기존 기능을 Spring Data Elasticsearch로 다시 구현하는 작업을 진행중이다. Elasticsearch도 RDB와 같이 Embedded 환경을 구성할 수 있지만 더이상 관리되지 않고 TestContainers를 사용하는 것을 권장하고 있으므로 Test 환경으로 TestContainer를 사용하기로 하였다. (참고: https://github.com/allegro/embedded-elasticsearch)
“Testcontainers를 이용한 한글 형태소 검색 테스트 환경 구축하기”라고 제목을 적긴하였지만 기존에 구현되어있는 Elasticsearch 환경을 TestContainers로 구현하면서 겪었던 이슈들을 적고 해결하던 과정도 함께 적어보자 한다.
들어가기 전에
이 글은 Kotlin + Spring Boot 환경에서 이야기를 진행해 가려고 한다. 그래서 Spring에 대한 전반적인 지식이 있는 것을 가정한다. 그리고 Spring Data Elasticsearch, Junit5, Spring MVC(사실 Web을 실행하지 않을꺼라 필요 없지만 RestClient가 필요해서 추가했다)를 사용한다.
앞에서 얘기했지만 Elasticsearch의 Index와 기본설정은 이미 구축되어있는 Elasticsearch 환경설정을 따르도록 한다.
기존 환경설정은 아래와 같다.
Component Template
PUT _component_template/timestamp
{
  "template": {
    "mappings": {
      "properties": {
        "@timestamp": {
          "type": "date"
        }
      }
    }
  }
}

PUT _component_template/korean_analyzer
{
  "template": {
    "settings": {
      "index": {
        "analysis": {
          "filter": {
            "edge_ngram_back": {
              "min_gram": "1",
              "side": "back",
              "type": "edge_ngram",
              "max_gram": "5"
            },
            "edge_ngram_front": {
              "min_gram": "1",
              "side": "front",
              "type": "edge_ngram",
              "max_gram": "5"
            }
          },
          "analyzer": {
            "korean": {
              "filter": [
                "lowercase",
                "trim"
              ],
              "type": "custom",
              "tokenizer": "nori_mixed"
            },
            "korean_ngram": {
              "filter": [
                "lowercase",
                "edge_ngram_front",
                "edge_ngram_back",
                "trim"
              ],
              "type": "custom",
              "tokenizer": "nori_mixed"
            }
          },
          "tokenizer": {
            "nori_mixed": {
              "type": "nori_tokenizer",
              "decompound_mode": "mixed"
            }
          }
        }
      }
    }
  }
}
Index template
PUT _index_template/product
{
  "index_patterns": [
    "product*"
  ],
  "template": {
    "settings": {
      "index": {
        "number_of_shards": "1",
        "number_of_replicas": "1"
      }
    },
    "mappings": {
      "properties": {
        "category": {
          "type": "text",
          "fields": {
            "ngram": {
              "type": "text",
              "analyzer": "korean_ngram"
            }
          },
          "analyzer": "korean"
        },
        "created_at": {
          "type": "date"
        },
        "id": {
          "type": "keyword"
        },
        "name": {
          "type": "text",
          "fields": {
            "ngram": {
              "type": "text",
              "analyzer": "korean_ngram"
            }
          },
          "analyzer": "korean"
        },
        "standard": {
          "type": "text",
          "fields": {
            "ngram": {
              "type": "text",
              "analyzer": "korean_ngram"
            }
          },
          "analyzer": "korean"
        },
        "unit": {
          "type": "text",
          "fields": {
            "ngram": {
              "type": "text",
              "analyzer": "korean_ngram"
            }
          },
          "analyzer": "korean"
        },
        "category_keyword": {
          "type": "keyword"
        },
        "name_keyword": {
          "type": "keyword"
        },
        "standard_keyword": {
          "type": "keyword"
        },
        "unit_keyword": {
          "type": "keyword"
        }
      }
    }
  },
  "composed_of": ["timestamp", "korean_analyzer"],
  "version": 1
}
TestContainer
TDD에서 테스트를 수행할 수 있는 환경을 구성하는 것은 중요하면서도 어렵고 번거로운 작업이다. 경우에 따라서는 환경 구성이 어려워 Mocking 등 Test Stub을 이용해야 하는 경우도 있다.
Embedded 환경을 제공해주는 인스턴스(H2, Embedded ActiveMQ 등)를 이용하면 손쉽고 빠르게 테스트 환경을 구성할 수 있겠지만 특정 인스턴스는 제공해주지 않거나 실제 환경과 달라 코드 실행 결과가 테스트와 상이한 경우도 있다.
로컬환경에서 테스트 시 종종 Docker를 이용하여 테스트 하기도 하는데, 자동화된 테스트를 CI환경에서 수행되도록 하려면 도커환경을 동일하게 설정해 주어야하는 번거로움이 있고 로컬환경과 설정값이 달라 예상치 못하게 다르게 수행되는 이슈등의 문제도 존재한다.
이럴때 사용하면 좋은 라이브러리가 바로 TestContainers이다. TestContainers는 Junit 테스트를 지원하는 자바 라이브러리로 데이터베이스, 셀레니움 등의 도커 컨테이너에서 실행할 수 있는 인스턴스를 제공해 준다.
최초 코드 작성 및 환경 구성
먼저 테스트를 위한 기본적인 환경을 구성하고 Index를 최소한의 스펙으로만 먼저 구성해보겠다.
의존성 추가
TestContainers에서는 RDBMS, Message Broker, Elasticsearch등 다양한 모듈을 제공해준다. 이 글에서는 Elasticsearch를 사용할 것이므로 Elasticsearch 모듈을 설치해주자.
// build.gradle.kts

dependencies {
    // 생략...

    testImplementation("org.testcontainers:elasticsearch:1.16.2")
    testImplementation("org.testcontainers:junit-jupiter:1.16.2")
}
Index 작성
Spring Data Elasticsearch에서 제공해주는 Document를 이용해서 기존에 만들어져있는 Index를 아래와 같이 정의하였다.
@Document(
  indexName = "product",
  writeTypeHint = WriteTypeHint.FALSE, // (1)
  createIndex = false, // (2)
)
@JsonNaming(PropertyNamingStrategies.SnakeCaseStrategy::class) // (3)
class Product private constructor(
    @Id
    val id: UUID,

    @Field(name = "created_at", type = FieldType.Date)
    val createdAt: ZonedDateTime,

    @MultiField( // (4)
        mainField = Field(type = FieldType.Text, analyzer = "korean"),
        otherFields = [InnerField(suffix = "ngram", type = FieldType.Text, analyzer = "korean_ngram")]
    )
    val name: String,

    @Field(name = "name_keyword", type = FieldType.Keyword)
    val nameKeyword: String,

    @MultiField(
        mainField = Field(type = FieldType.Text, analyzer = "korean"),
        otherFields = [InnerField(suffix = "ngram", type = FieldType.Text, analyzer = "korean_ngram")]
    )
    val category: String,

    @Field(name = "category_keyword", type = FieldType.Keyword)
    val categoryKeyword: String,

    @MultiField(
        mainField = Field(type = FieldType.Text, analyzer = "korean"),
        otherFields = [InnerField(suffix = "ngram", type = FieldType.Text, analyzer = "korean_ngram")]
    )
    val standard: String?,

    @Field(name = "standard_keyword", type = FieldType.Keyword)
    val standardKeyword: String?,

    @MultiField(
        mainField = Field(type = FieldType.Text, analyzer = "korean"),
        otherFields = [InnerField(suffix = "ngram", type = FieldType.Text, analyzer = "korean_ngram")]
    )
    val unit: String?,

    @Field(name = "unit_keyword", type = FieldType.Keyword)
    val unitKeyword: String?,
) {
    constructor(
        id: UUID,
        createdAt: ZonedDateTime,
        name: String,
        category: String,
        standard: String?,
        unit: String?,
    ) : this(
        id = id,
        createdAt = createdAt,
        name = name,
        nameKeyword = name,
        category = category,
        categoryKeyword = category,
        standard = standard,
        standardKeyword = standard,
        unit = unit,
        unitKeyword = unit,
    )
}
-
(1)
writeTypeHint = WriteTypeHint.FALSESpring Data Elasticsearch에서 Document를 정의하면 기본설정으로 아래와 같이 타입힌트를 제공한다.
{
  "_class": "com.example.es.Product",
  "id": "3567bb71-126a-400c-9c18-ca6ff5698474"
  // ... 생략
}
기존 Index에는 타입힌트가 없다. 그래서 타입힌트가 저장되지 않도록 한다.
-
(2)
createIndex = false기존에 이미 만들어진 Index가 있으므로 Index 생성옵션을 disable 처리한다.
-
(3)
@JsonNaming(PropertyNamingStrategies.SnakeCaseStrategy::class)기존에 정의된 Index의 Property 명은 Snake case로 되어 있다. 하지만 Kotlin에는 Property 명을 정의할때 주로 Camel case를 사용한다. 위 설정을한다면 모든 Snake case를 Camel case로 반대로 Camel case를 Snake case로 변환해준다.
-
(4)
@MultiField기존의 설정값을 보면 아래와 같이 muti field를 사용하는 것을 볼 수 있다.
"name": {
  "type": "text",
  "fields": {
    "ngram": {
      "type": "text",
      "analyzer": "korean_ngram"
    }
  },
  "analyzer": "korean"
}
그래서 동일한 Index로 동작하게 하기 위해 MutliField로 정의하였다.
Repository 작성
Spring Data Elasticsearch에서는 아래와 같이 단순히 repository 인터페이스를 만든 후 ElasticsearchRepository를 구현하면 된다.
interface ProductIndexRepository : ElasticsearchRepository<ProductIndex, UUID>
다만 기존에 사용하는 쿼리는 ElasticsearchRepository에서 기본 제공해주는 QueryMethod로는 표현할 수 없다. @Query를 통해서 표현할 순 있겠지만 문자열을 통한 쿼리표현은 유지보수성이 많이 떨어지므로 추천하지 않는 방식이다. 그래서 선택한 방법이 QueryDSL과 같이 CustomRepository를 만들어서 사용하는 것이다.
interface ProductRepository : ElasticsearchRepository<Product, UUID>, CustomProductRepository

interface CustomProductRepository { // (1)
    fun findByKeyword(keyword: String, pageable: Pageable): Page<Product>
}

@Suppress("unused")
class CustomProductRepositoryImpl( // (2)
    private val restHighLevelClient: RestHighLevelClient,
) : CustomProductRepository {
    override fun findByKeyword(keyword: String, pageable: Pageable): Page<Product> { // (3)
        val query = QueryBuilders.multiMatchQuery(keyword)
            .field("name", 10f)
            .field("category", 7f)
            .field("standard", 4f)
            .field("unit", 4f)
            .field("name.ngram", 3f)
            .field("category.ngram", 2f)
            .field("standard.ngram")
            .field("unit.ngram")

        val source = SearchSourceBuilder()
            .trackTotalHits(true)
            .query(query)
            .sort("_score")
            .sort("created_at")
            .from(pageable.offset.toInt())
            .size(pageable.pageSize)

        val request = SearchRequest()
        request.indices("product")
        request.source(source)

        val response = restHighLevelClient.search(request, RequestOptions.DEFAULT)
        val content = response.hits.hits.map {
            jacksonMapperBuilder().addModule(JavaTimeModule()).build() // (4)
                .readValue(it.sourceAsString, Product::class.java)
        }

        return PageImpl(content, pageable, response.hits.totalHits?.value ?: 0)
    }
}
-
(1)
CustomProductRepository새로운 함수를 제공하기 위해서 커스텀 Repository를 추가한다.
-
(2)
CustomProductRepositoryImpl커스텀 repository 구현체는 기본적으로 클래스명의 끝에
Impl이라는 문자를 포함해야 한다. (Spring Data Elasticsearch 문서 참고) -
(3)
findByKeyword해당 함수는 아래와 같이 실행된다.
POST /cart_product/_search { "from": 0, "size": 10, "query": { "multi_match": { "query": "국산", "fields": [ "category^7.0", "category.ngram^2.0", "name^10.0", "name.ngram^3.0", "standard^4.0", "standard.ngram^1.0", "unit^4.0", "unit.ngram^1.0" ], "type": "best_fields", "operator": "OR", "slop": 0, "prefix_length": 0, "max_expansions": 50, "zero_terms_query": "NONE", "auto_generate_synonyms_phrase_query": true, "fuzzy_transpositions": true, "boost": 1.0 } }, "sort": [{ "_score": { "order": "desc" } }, { "id": { "order": "asc" } }], "track_total_hits": 2147483647 } -
(4)
jacksonMapperBuilder().addModule(JavaTimeModule()).build()Jackson의 기본 ObjectMapper를 사용하면
Java 8 date/time을 지원하지 않는다. 이를 지원하도록 하기 위해서는JavaTimeModule()모듈을 추가해야 한다. (jackson-modules-java8 참고)
테스트 설정
테스트를 실행하기 위해서 실행 환경설정이 필요하다.
Container 설정은 TestContainer 로 멱등성있는 integration test 환경 구축하기를 참고했다.
class ElasticsearchTestContainer {
    companion object {
        @Container
        @JvmStatic
        val CONTAINER = ElasticsearchContainer("docker.elastic.co/elasticsearch/elasticsearch:7.15.2")
            .apply { start() }
    }
}
TestConfiguration 설정을 통해서 Elasticsearch Client 설정을 해준다. 설정시 Container의 접속정보를 활용한다.
@TestConfiguration
@EnableElasticsearchRepositories
class TestConfiguration : AbstractElasticsearchConfiguration() {
    @Bean
    override fun elasticsearchClient(): RestHighLevelClient {
        val config = ClientConfiguration.builder()
            .connectedTo(TestContainer.CONTAINER.httpHostAddress)
            .build()

        return RestClients.create(config).rest()
    }
}
테스트 코드 작성
@SpringBootTest(classes = [TestConfiguration::class, ProductRepository::class]) // (1)
class ProductRepositoryTest {

    @Autowired
    private lateinit var productRepository: ProductRepository

    @BeforeEach
    fun setUp() {
        productRepository.deleteAll() // (2)
    }

    @Test
    @DisplayName("주어진 키워드를 포함한 모든 Index를 조회한다.")
    fun test1() {
        // Given
        createIndexes()

        // When
        val actual = productRepository.findByKeyword("국산", Pageable.ofSize(10))

        // Then
        assertEquals(5, actual.totalElements)
        assertEquals(5, actual.content.size)
    }

    @Test
    @DisplayName("조회 결과 중 스코어가 가장 높은 Index가 첫번째로 반환된다.")
    fun test2() {
        // Given
        createIndexes()

        // When
        val actual = productRepository.findByKeyword("국산", Pageable.ofSize(10))

        // Then
        // 검색 일치 가산점 중 이름이 가장 스코어 점수가 높고, 스코어 다음 등록일시를 우선순위로 정렬한다.
        assertEquals("사과/국산", actual.content.first().name)
    }

    @Test
    @DisplayName("페이징된 조회결과를 반환한다.")
    fun test3() {
        // Given
        createIndexes()

        // When
        val actual = productRepository.findByKeyword("국산", PageRequest.of(1, 2))

        // Then
        assertEquals(5, actual.totalElements)
        assertEquals(2, actual.content.size)
        // 첫번째 페이지는 이름에 대한 가산점이 가장 높은 "사과/국산", "배/국산" 이다.
        assertEquals("양상추", actual.content.first().name)
    }

    private fun createIndexes() { // (3)
        val indexes = listOf(
            Product(
                id = UUID.randomUUID(),
                createdAt = ZonedDateTime.now(),
                name = "사과/국산",
                category = "과일",
                standard = null,
                unit = null,
            ),
            Product(
                id = UUID.randomUUID(),
                createdAt = ZonedDateTime.now(),
                name = "배/국산",
                category = "과일",
                standard = null,
                unit = null,
            ),
            Product(
                id = UUID.randomUUID(),
                createdAt = ZonedDateTime.now(),
                name = "상추",
                category = "채소",
                standard = null,
                unit = null,
            ),
            Product(
                id = UUID.randomUUID(),
                createdAt = ZonedDateTime.now(),
                name = "양상추",
                category = "국산 채소",
                standard = null,
                unit = null,
            ),
            Product(
                id = UUID.randomUUID(),
                createdAt = ZonedDateTime.now(),
                name = "딸기",
                category = "과일",
                standard = "국산",
                unit = null,
            ),
            Product(
                id = UUID.randomUUID(),
                createdAt = ZonedDateTime.now(),
                name = "선지국",
                category = "국",
                standard = "1KG",
                unit = "국자",
            ),
        )
        productRepository.saveAll(indexes)
    }
}
-
(1)
@SpringBootTest(classes = [TestConfiguration::class, ProductRepository::class])테스트 시 Testcontainers를 실행하기 위해 테스트 설정 에서 작성한 테스트 설정을 로드한다.
-
(2)
productRepository.deleteAll()테스트가 수행되는 동안 Container를 실행 중이기 때문에 테스트 실행 전 데이터 클리닝이 필요하다.
-
(3)
createIndexes중복 코드를 제거하기 위해 Index 생성코드를 따로 추출하였다.
템플릿 추가
위에서 작성한데로 테스트 코드를 작성하고 실행하면 아래와 같이 오류가 발생한다.
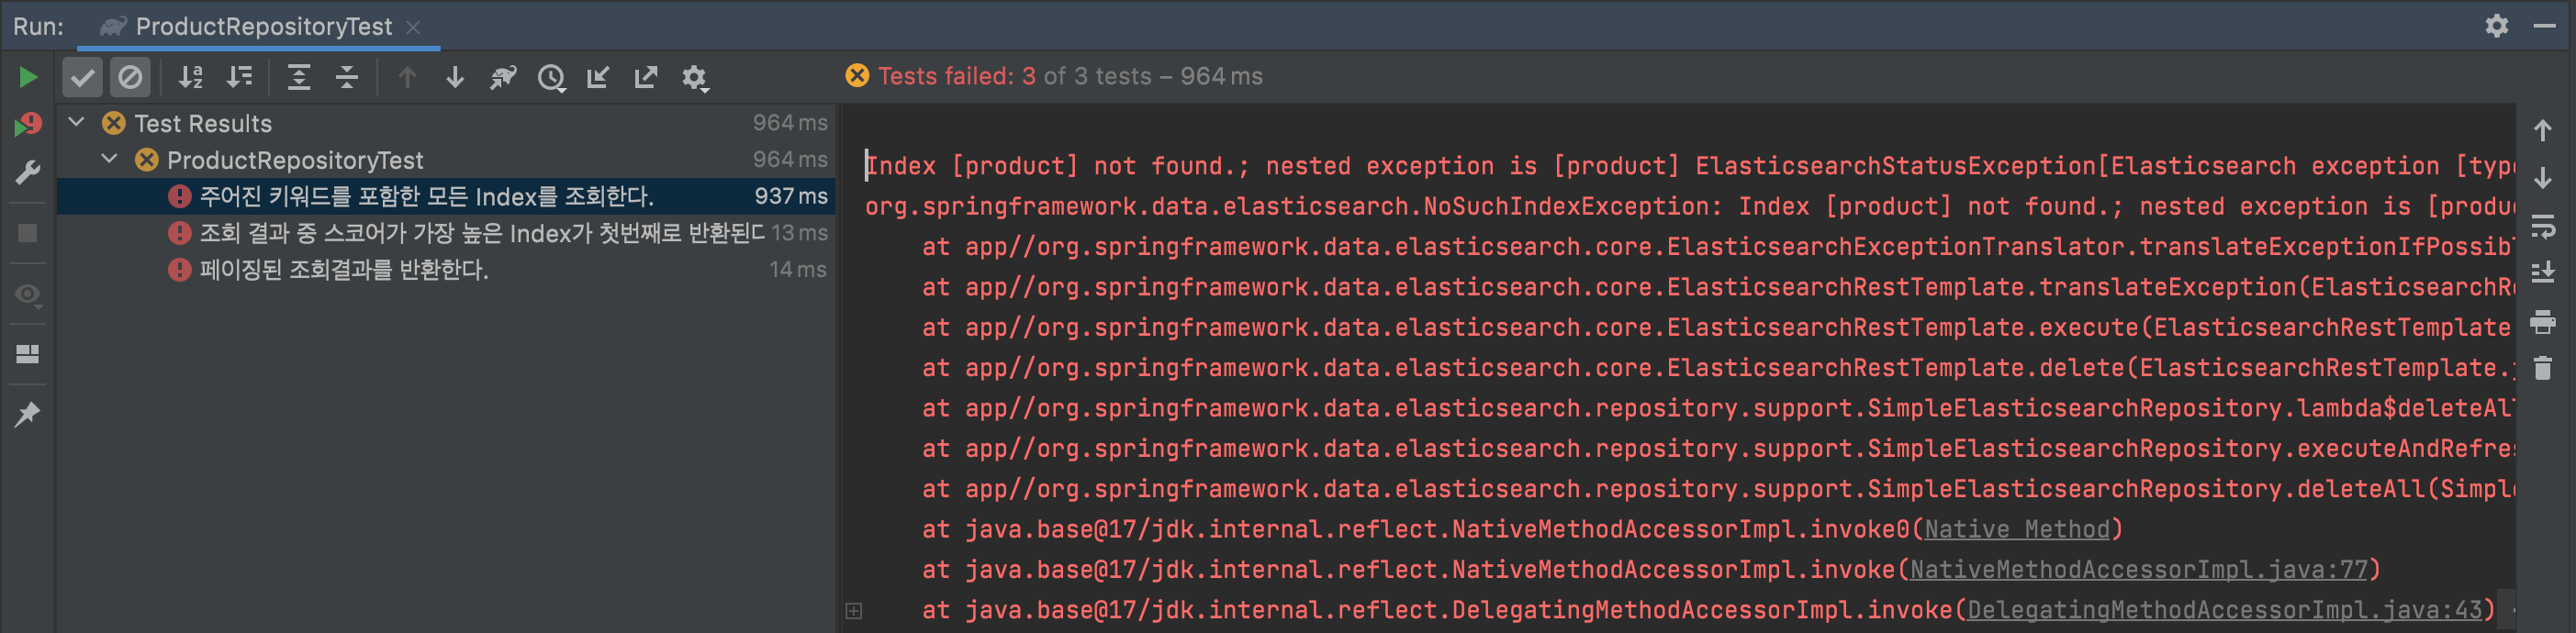
오류코드를 보니 Index가 없다고 한다.
Index 작성에서 보면 기존에 정의된 Index를 그대로 사용하기 위해서 Index를 새롭게 생성하지 않도록 설정하였기 때문이다. 하지만 테스트 환경에서는 이미 설정된 Index가 없기 때문에 TestConfiguration에서 Index를 새롭게 만들어주도록 설정해주자.
@TestConfiguration
@EnableElasticsearchRepositories
class TestConfiguration : AbstractElasticsearchConfiguration() {
    @Bean
    override fun elasticsearchClient(): RestHighLevelClient {
        val config = ClientConfiguration.builder()
            .connectedTo(TestContainer.CONTAINER.httpHostAddress)
            .build()

        val client = RestClients.create(config).rest()

        val request = CreateIndexRequest("product")
        client.indices().create(request, RequestOptions.DEFAULT)

        return client
    }
}
하지만 이렇게 설정을 해주면 또다른 오류를 만나게 된다.
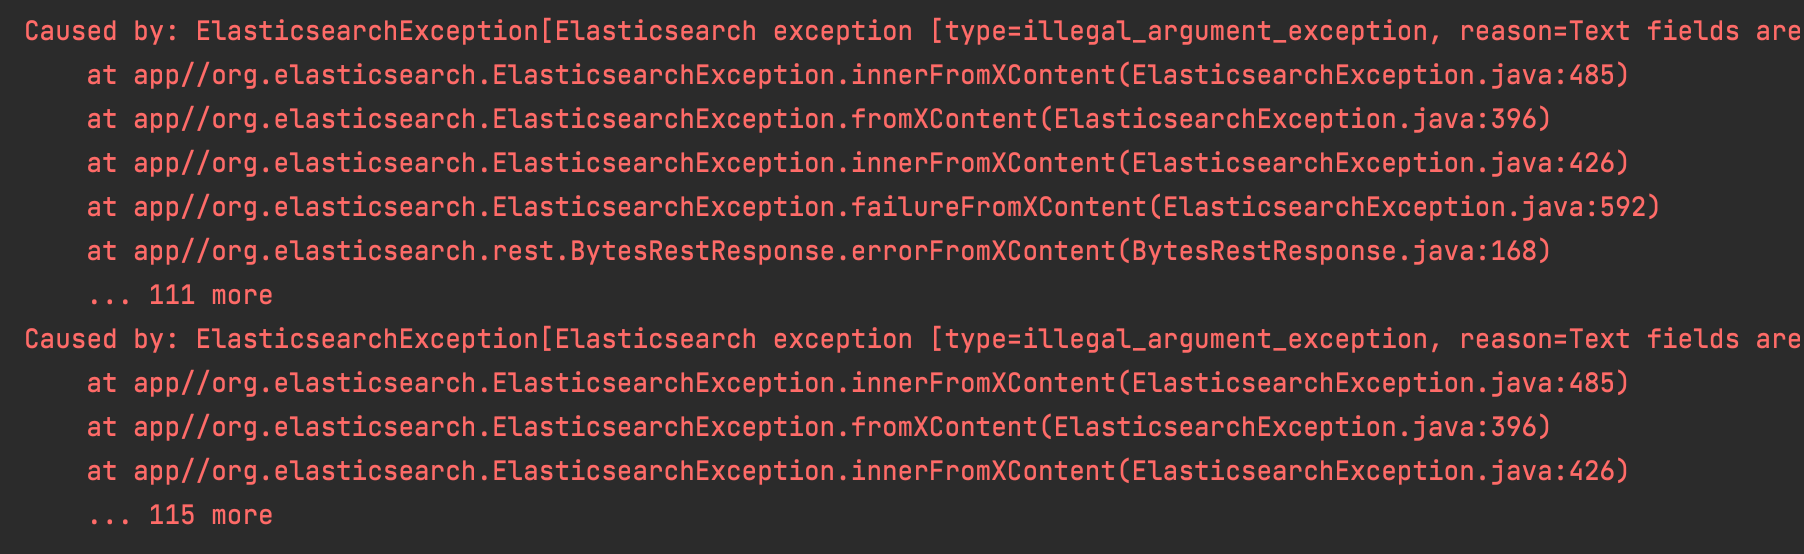
아무래도 이렇게 진행해서는 오류화면만 볼 것 같다. 앞서 적어두었던 설정들을 모두 적용해 주자. elasticsearchClient Bean이 생성되는 시점에 설정이 모두 적용되어야 하므로 Factory 만들면 좋을 것 같다.
internal class RestHighLevelClientFactory(address: String) {
    val client: RestHighLevelClient
        get() = RestClients.create(clientConfiguration).rest()
            .apply {
                putTimestampComponentTemplate() // (1)
                putKoreanAnalyzerComponentTemplate() // (2)
                putIndexTemplate() // (3)
                createIndex() // (4)
            }

    private fun RestHighLevelClient.createIndex() {
        val request = CreateIndexRequest("product")
        this.indices().create(request, RequestOptions.DEFAULT)
    }

    private val clientConfiguration = ClientConfiguration.builder()
        .connectedTo(address)
        .build()

    private fun RestHighLevelClient.putIndexTemplate() {
        val settings = settings("elasticsearch/index_template/product/settings.json")
        val mappings = mappings("elasticsearch/index_template/product/mappings.json")
        val template = Template(settings, mappings, null)

        val indexTemplate = ComposableIndexTemplate(
            listOf("product*"),
            template,
            listOf("timestamp", "korean_analyzer"),
            null,
            1,
            null,
        )
        val request = PutComposableIndexTemplateRequest().name("product")
        request.indexTemplate(indexTemplate)

        this.indices().putIndexTemplate(request, RequestOptions.DEFAULT)
    }

    private fun RestHighLevelClient.putTimestampComponentTemplate() {
        val mappings = mappings("elasticsearch/component_template/timestamp.json")
        val template = Template(null, mappings, null)

        val request = PutComponentTemplateRequest().name("timestamp")
        request.componentTemplate(ComponentTemplate(template, null, null))

        this.cluster().putComponentTemplate(request, RequestOptions.DEFAULT)
    }

    private fun RestHighLevelClient.putKoreanAnalyzerComponentTemplate() {
        val settings = settings("elasticsearch/component_template/korean_analyzer.json")
        val template = Template(settings, null, null)

        val request = PutComponentTemplateRequest().name("korean_analyzer")
        request.componentTemplate(ComponentTemplate(template, null, null))

        this.cluster().putComponentTemplate(request, RequestOptions.DEFAULT)
    }

    private fun mappings(path: String): CompressedXContent {
        val mappingsContent = resourceContent(path)
        return CompressedXContent(mappingsContent)
    }

    private fun settings(path: String): Settings {
        val settingsContent = resourceContent(path)
        return Settings.builder()
            .loadFromSource(settingsContent, XContentType.JSON)
            .build()
    }

    private fun resourceContent(path: String): String {
        val settingsResource = ClassPathResource(path)
        return IOUtils.toString(settingsResource.inputStream, StandardCharsets.UTF_8)
    }
}
-
(1)
putTimestampComponentTemplate()timestamp 컴포넌트 템플릿을 추가해준다. (참고: Component Template)
-
(2)
putKoreanAnalyzerComponentTemplate()analyzer 컴포넌트 템플릿을 추가해준다. (참고: Component Template)
-
(3)
putIndexTemplate()Index 템플릿을 추가해준다. (참고: Index template)
-
(4)
createIndex()Index르 추가한다.
리소스 파일까지 적는것은 내용이 너무 커질것 같으므로 작성된 Github을 참고하자.
Configuration에서도 Factory를 사용하도록 변경해준다.
@TestConfiguration
@EnableElasticsearchRepositories
class TestConfiguration : AbstractElasticsearchConfiguration() {
    @Bean
    override fun elasticsearchClient(): RestHighLevelClient {
        return RestHighLevelClientFactory(TestContainer.CONTAINER.httpHostAddress).client
    }
}
테스트를 실행하지만 이번에도 실패화면이 표시된다.
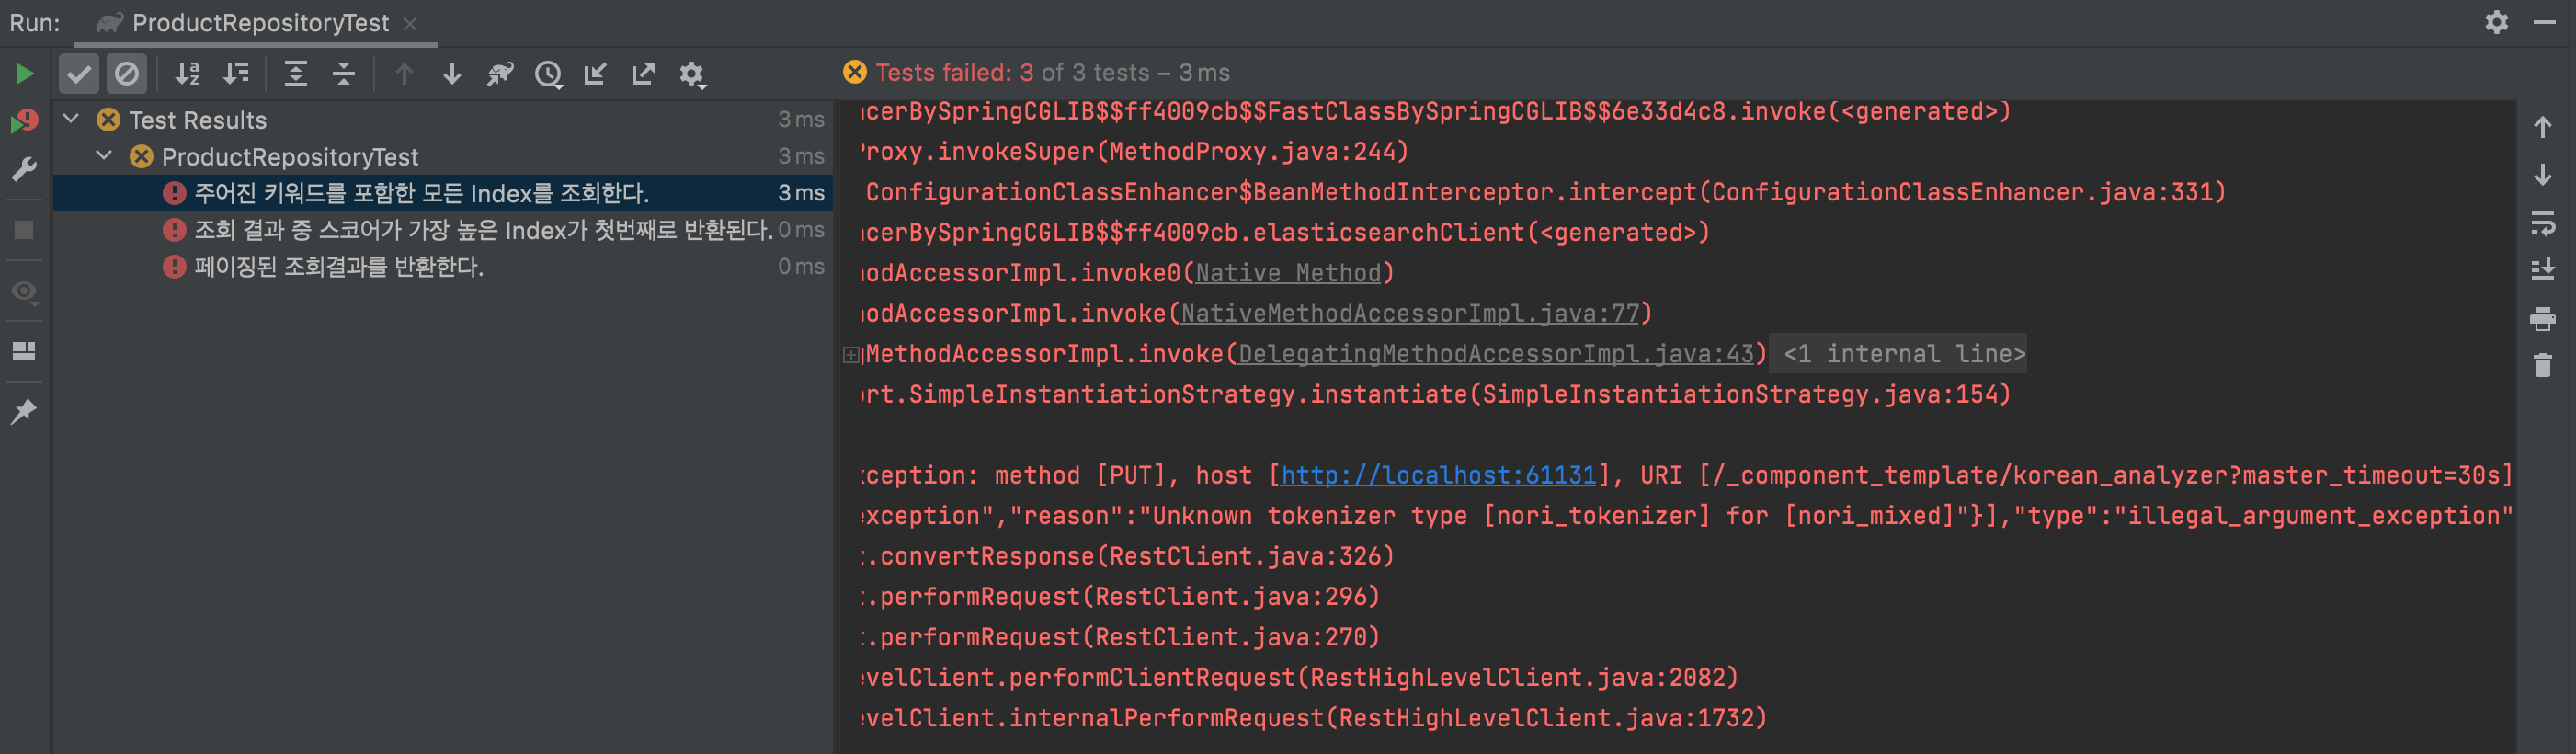
nori_tokenizer, nori_mixed가 눈에 띈다. Container에 분석기가 설치되지 않아서 인것 같다.
Container에 nori 분석기 설치
TestContainer에 nori anlyzer plugin을 추가해 주자. 일단 기존 코드에 plugin 설치 커멘드를 추가해 보자.
class TestContainer {
    companion object {
        @Container
        @JvmStatic
        val CONTAINER = ElasticsearchContainer("docker.elastic.co/elasticsearch/elasticsearch:7.8.1")
            .apply { withCommand("bin/elasticsearch-plugin install analysis-nori") }
            .apply { start() }
    }
}
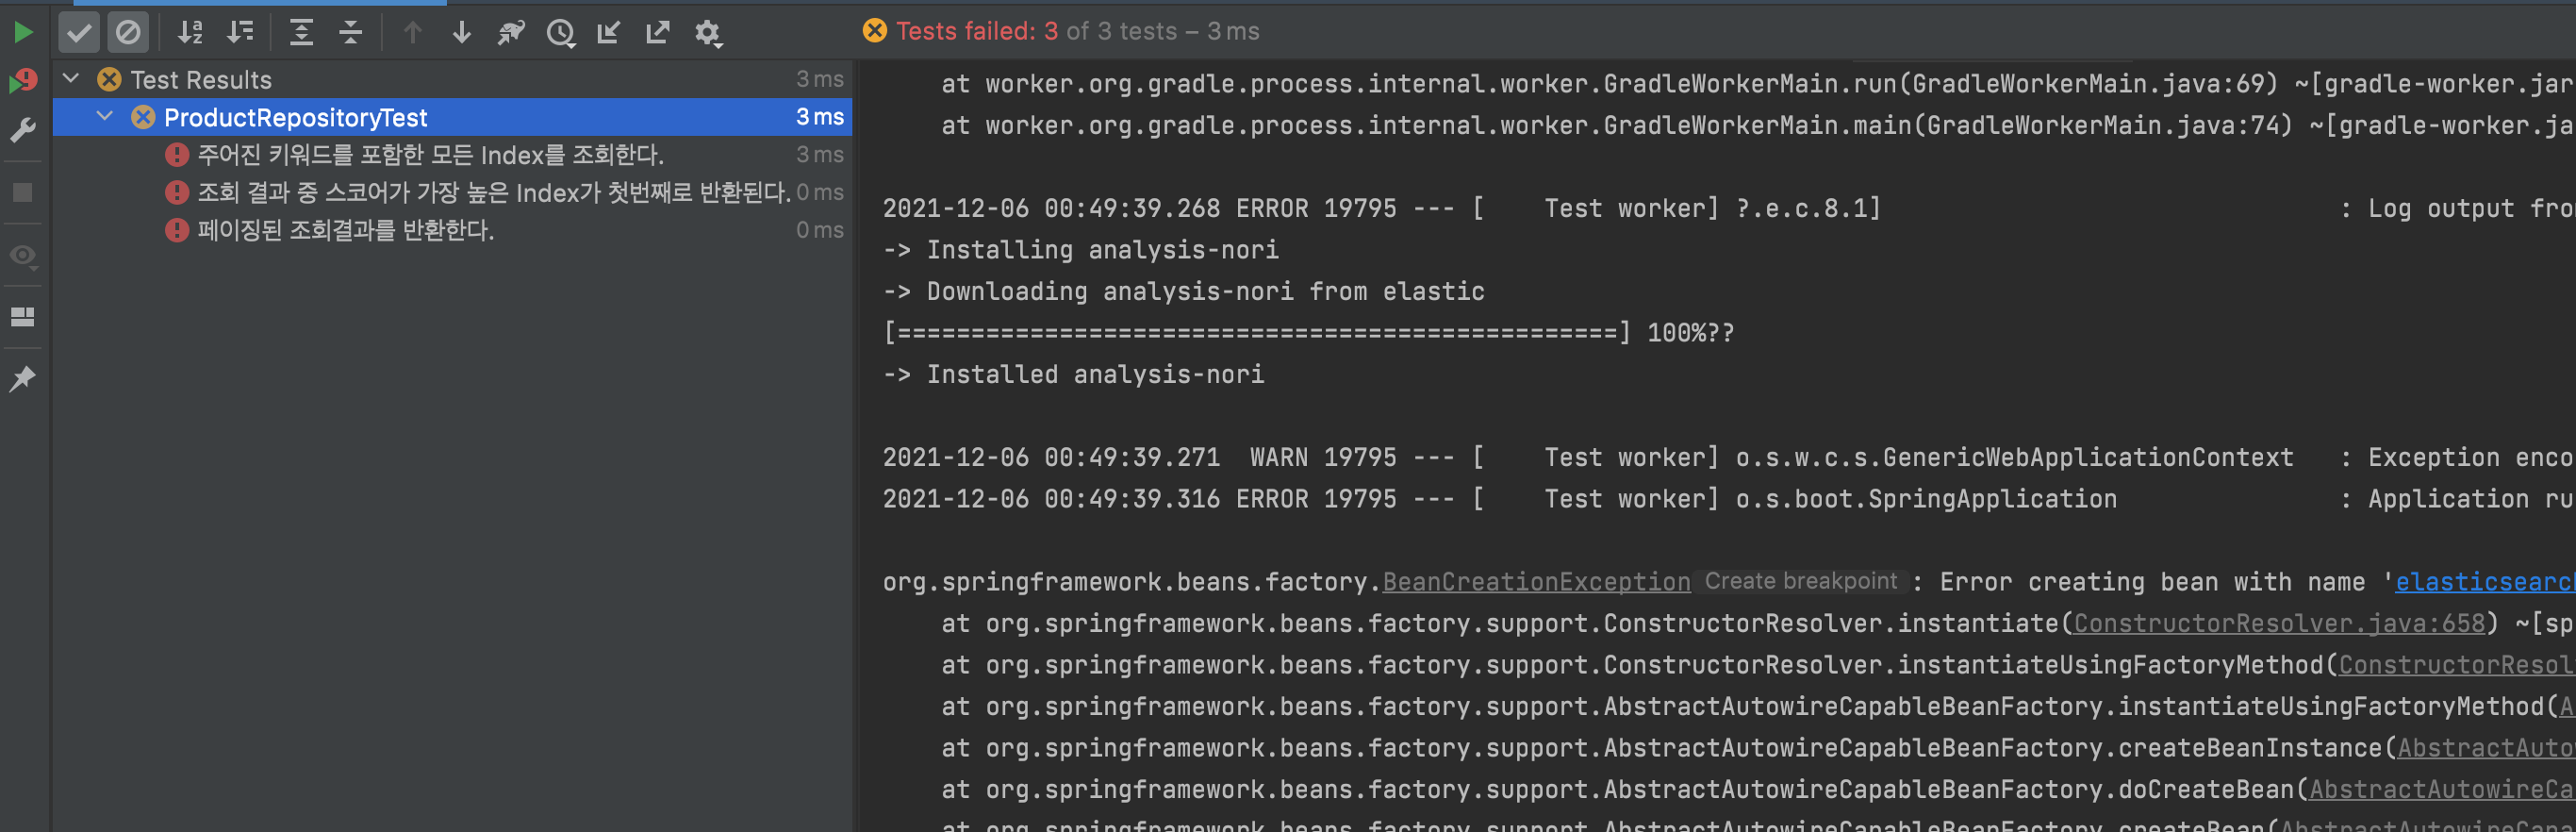
아쉽게도 컨테이너 실행 시 오류가 발생한다. nori analyzer가 설치된 흔적은 보이지만 Container가 실행되지 않는다.
ElasticsearchContainer를 이용해서는 해당 이슈를 풀 수 없을 것 같다. Nori plugin이 설치된 이미지를 컨테이너에 실행할 수 있도록 Creating images on-the-fly를 이용해 보자.
DockerFile을 이용할 수도 있지만 복잡한 설정이 아니므로 kotlin 코드에서만 작성했다.
TestContainers 설정을 먼저보자. 기존 ElasticsearchContainer를 사용하지 않고 상위 클래스인 GenericContainer를 사용한다. 그로인해 ElasticsearchContainer에서 자동으로 설정해주던 것들을 추가로 정의해주어야 한다.
class TestContainer {
    companion object {
        @Container
        @JvmStatic
        val CONTAINER = GenericContainer<Nothing>(
            ImageFromDockerfile().withDockerfileFromBuilder { // (1)
                it.from("docker.elastic.co/elasticsearch/elasticsearch:7.8.1")
                    .run("bin/elasticsearch-plugin install analysis-nori")
                    .build()
            }
        )
            .apply { withEnv("discovery.type", "single-node") } // (2)
            .apply { addExposedPorts(9200, 9300) } // (3)
            .apply { start() }
    }
}
-
(1)
ImageFromDockerfile().withDockerfileFromBuilderHub에서 이미지를 가져오는 것이 아닌 builder를 통해 nori 분석기가 설치된 만들어진 이미지를 이용한다.
-
(2)
withEnv("discovery.type", "single-node")Elasticsearch가 싱글노드에서 실행되도록 한다.
-
(3)
addExposedPorts(9200, 9300)기본 포트인 9200과 9300 포트를 연결한다.
TestContainer 구현체를 바꾸면서 기존에 ElasticsearchContainer에서 제공해주던 httpHostAddress는 더이상 쓸 수 없다. 그래서 Configuration을 아래과 같이 바꿔주자.
@TestConfiguration
@EnableElasticsearchRepositories
class TestConfiguration : AbstractElasticsearchConfiguration() {
    @Bean
    override fun elasticsearchClient(): RestHighLevelClient {
        val hostAddress = "${TestContainer.CONTAINER.host}:${TestContainer.CONTAINER.getMappedPort(9200)}"
        return RestHighLevelClientFactory(hostAddress).client
    }
}
그리고 이제 필요없어진 Elasticsearch TestContainers의존성도 제거해주자.
testImplementation("org.testcontainers:elasticsearch:1.16.2")
이제 테스트를 수행해보자.
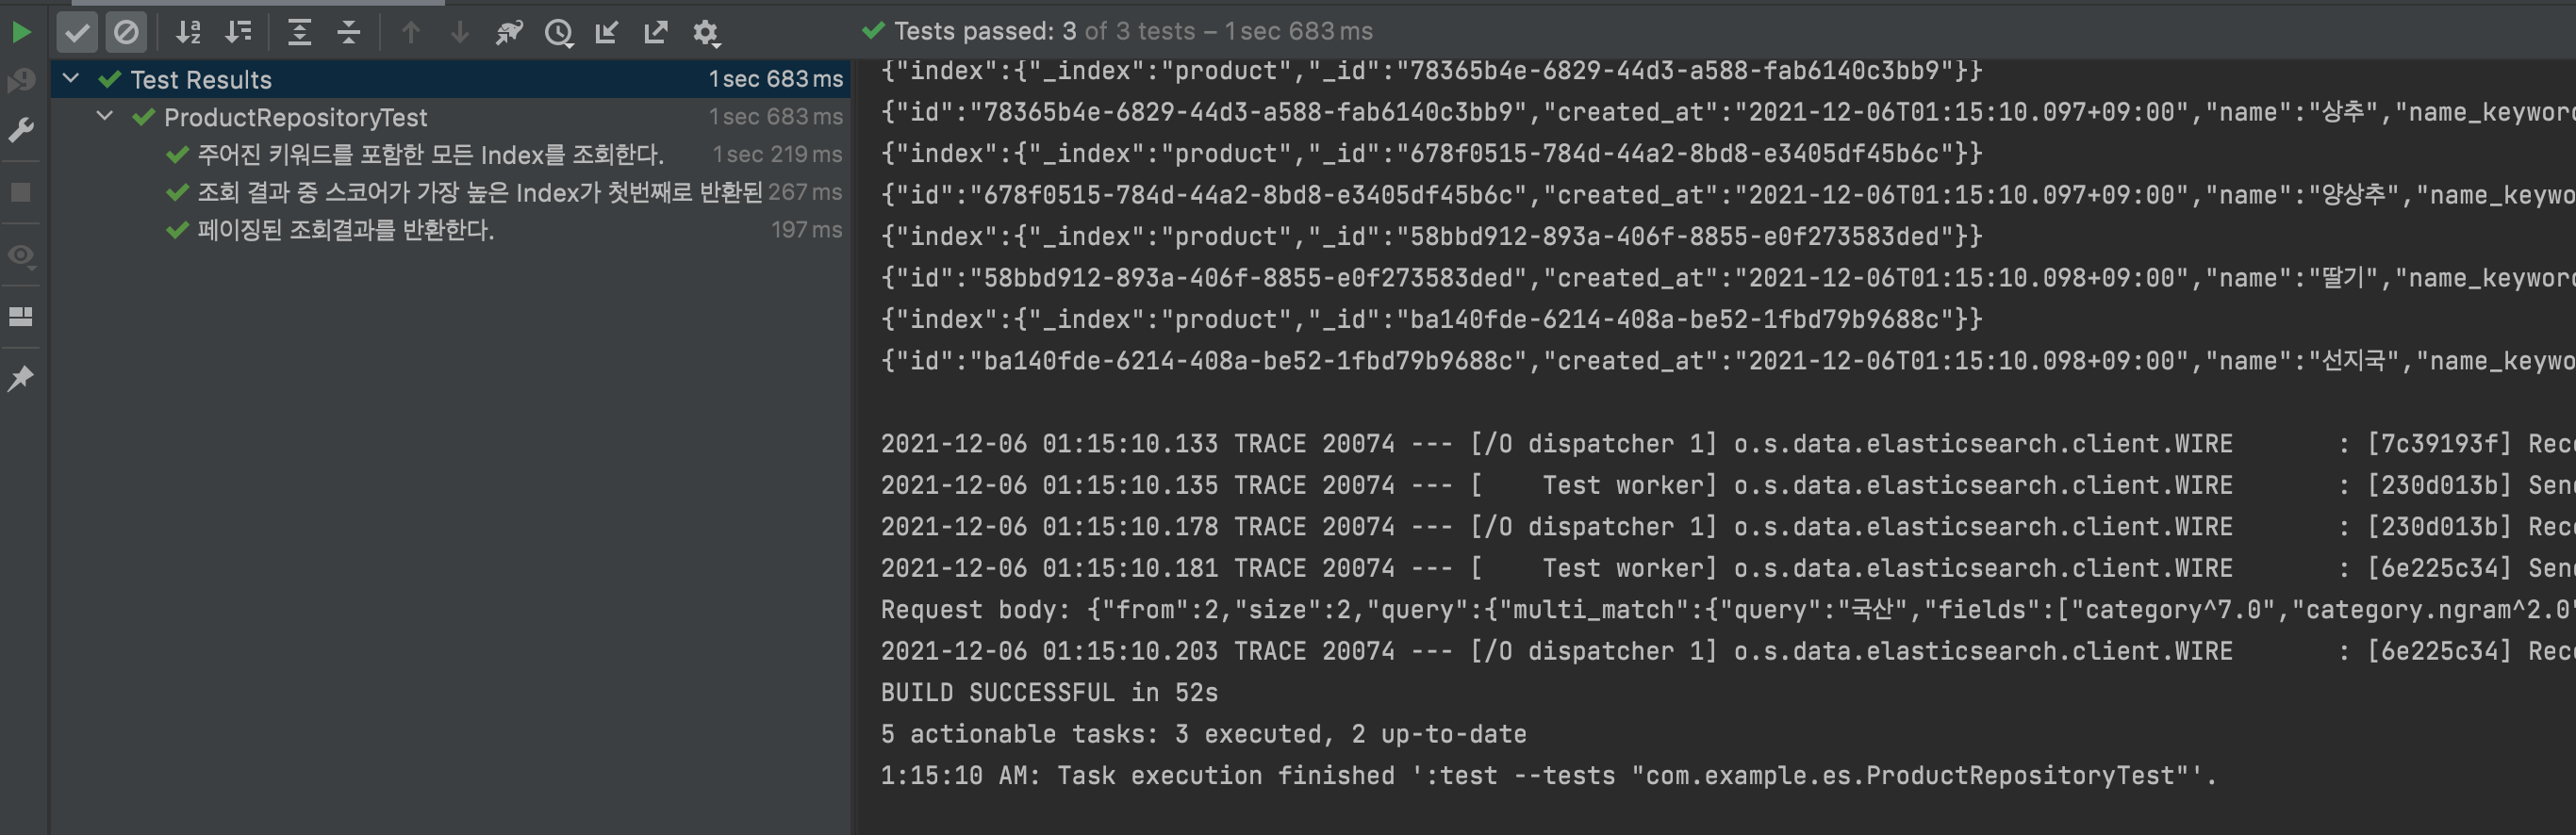
성공적으로 테스트가 수행된것을 확인할 수 있다.
마치며
사실 nori analyzer를 설치하는 부분에서 상당기간 삽질을 했다…생각보다 해당 코드에 대한 최근 레퍼런스가 많지 않았다. 이 글을 통해서 혹시나 TestContainers를 이용하여 Elasticsearch에 nori analyzer를 설치할때 삽질을 덜 하길 바란다.
해당 글에서 사용된 코드는 https://github.com/veluxer62/spring-data-elasticsearch-with-test-container 에 올려두었으니 참고하길 바란다.